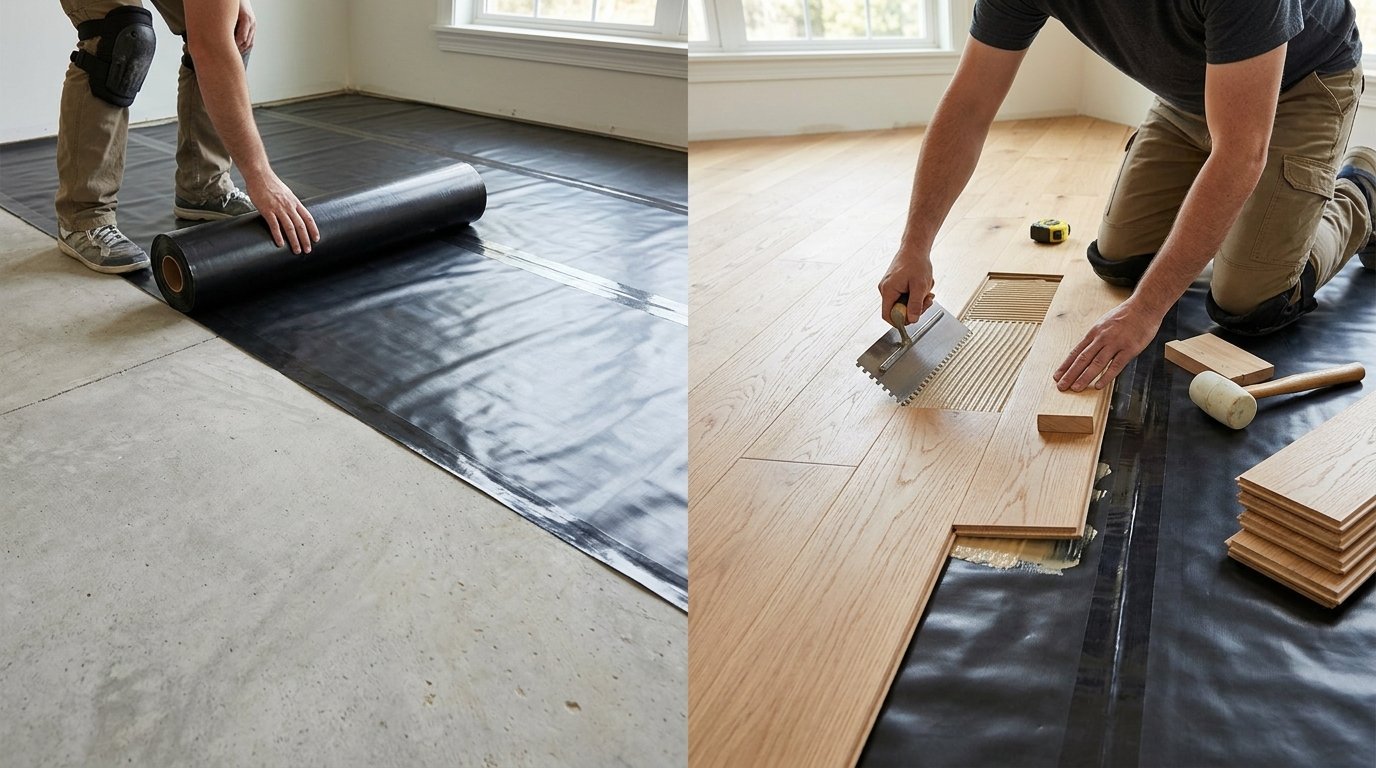

Attaching hardwood floor to concrete is entirely possible using methods like glue-down installation, floating floors, or plywood subfloor systems. The right approach depends on moisture levels, concrete condition, and the type of hardwood being installed.
Why Concrete Requires Special Preparation
Concrete behaves very differently from wood subfloors when it comes to moisture and stability. Understanding these differences is the first step before choosing any installation method.
Concrete Retains Moisture Naturally
Concrete slabs, especially in basements or ground-level rooms, can hold moisture long after they appear dry. This trapped moisture can seep into hardwood over time and cause warping or buckling. Testing moisture levels before installation prevents this issue from developing later.
Concrete Surfaces Are Rarely Perfectly Flat
Even newly poured concrete often has minor dips, ridges, or uneven patches across its surface. Hardwood flooring requires a flat base to sit securely without gaps or movement. Skipping the leveling step leads to squeaky or unstable floors down the line.
Concrete Does Not Flex Like Wood Subfloors
Wood subfloors have slight natural give, while concrete remains rigid and completely inflexible. This difference affects how hardwood expands and contracts with temperature changes throughout the year. Installation methods need to account for this rigid, unmoving base.
Testing Concrete Before Installation
Before deciding how to attach hardwood floor to concrete, testing the slab is a non-negotiable first step. Skipping this stage risks costly damage to the hardwood after installation is complete.
Moisture Testing With a Calcium Chloride Test
This test measures how much moisture vapor is escaping the concrete surface over a set time period. Results falling within an acceptable range confirm the slab is dry enough for hardwood installation. High readings mean the slab needs additional drying time or a moisture barrier.
Checking for Cracks or Structural Damage
Any visible cracks, crumbling edges, or uneven settling in the concrete should be repaired first. These issues can worsen under the weight and pressure of hardwood flooring over time. Patching compounds are typically used to fix minor cracks before moving forward.
Confirming the Slab Is Fully Cured
New concrete slabs need adequate curing time, often around thirty days, before flooring installation begins. Installing hardwood too soon traps residual moisture that was still evaporating from the fresh concrete. Waiting for full cure time protects the flooring investment significantly.
Methods to Attach Hardwood Floor to Concrete
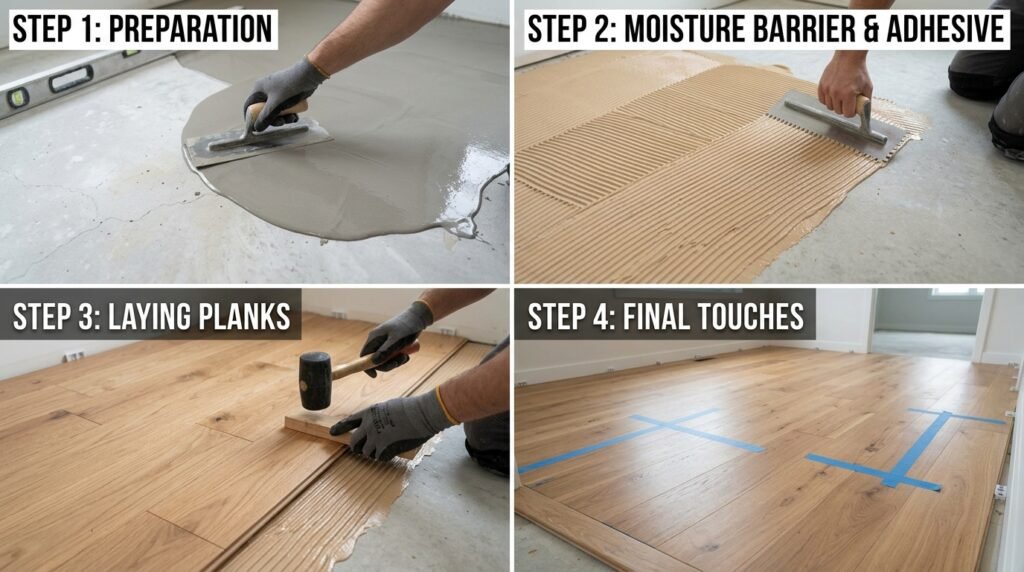
There are three widely used methods for this type of installation, each suited to different situations. Choosing the right one depends on budget, hardwood type, and how much floor height increase is acceptable.
Glue-Down Installation Method
This method involves applying a strong adhesive directly between the concrete and the hardwood planks. It works best with engineered hardwood, which handles moisture changes better than solid wood. The adhesive also helps reduce noise and adds a stable, secure feel underfoot.
Floating Floor Installation Method
A floating floor uses interlocking planks placed over a foam underlayment without any direct attachment to concrete. This method is faster to install and easier to remove or replace later if needed. It works well in rooms with slightly uneven concrete surfaces.
Plywood Subfloor Attachment Method
This approach involves fastening plywood sheets to the concrete first, creating a traditional wood subfloor base. Hardwood is then nailed or stapled directly into the plywood layer above. This method suits solid hardwood flooring that requires nailing rather than gluing.
Table: Comparing Installation Methods
| Method | Best For | Floor Height Impact |
| Glue-Down | Engineered hardwood | Minimal increase |
| Floating Floor | Uneven concrete, quick installs | Low to moderate increase |
| Plywood Subfloor | Solid hardwood, nail-down needs | Highest increase |
Step-by-Step Installation Process
Once the concrete passes moisture and condition testing, the actual installation follows a fairly structured sequence. Each step builds on the previous one to ensure a stable, long-lasting floor.
Install a Moisture Barrier First
A vapor barrier or moisture-blocking membrane should be applied directly onto the clean concrete surface. This layer prevents residual moisture from ever reaching the hardwood material above it. Skipping this step is one of the most common causes of future flooring damage.
Apply Adhesive or Underlayment Based on Method Chosen
For glue-down installations, adhesive is spread evenly using a trowel across small sections at a time. For floating floors, foam underlayment is rolled out flat across the entire floor area instead. Each material should be applied according to manufacturer spacing and coverage instructions.
Lay the Hardwood Planks Carefully
Planks are placed starting from one wall, working row by row across the room systematically. Glue-down planks need firm pressing to ensure full adhesive contact with the concrete beneath. Floating planks simply click together without needing pressure or drying time.
Allow Proper Curing Time Before Use
Glued hardwood floors typically need twenty-four to forty-eight hours before furniture or foot traffic resumes. This curing period allows the adhesive to fully bond and reach maximum strength. Rushing this step can weaken the bond and shift planks out of place.
Pros and Cons of Installing Hardwood Over Concrete
Every method carries certain advantages and drawbacks worth considering before committing to a full installation. Weighing these factors helps match the right method to your specific space.
Advantages of This Installation Approach
Hardwood over concrete adds warmth and comfort to otherwise cold, hard flooring surfaces like basements. It also increases property value more than most other flooring upgrade options available. Properly installed hardwood can last decades with minimal maintenance required.
Drawbacks to Keep in Mind
Moisture issues remain the biggest long-term risk if testing and barriers are skipped during installation. Concrete slabs below ground level are generally more prone to future moisture problems. Repair or replacement later can be more labor-intensive than with standard wood subfloors.
How This Compares to Other Flooring Guides
Many existing guides mention gluing hardwood down but skip the critical moisture testing and curing time details covered here. This guide also compares all three major methods side by side, giving a clearer, more complete picture for readers deciding between options.
FAQs
Can solid hardwood be glued directly to concrete?
Solid hardwood is generally not recommended for gluing; engineered hardwood handles concrete moisture better.
How long should a new concrete slab cure before installation?
Most experts recommend waiting around thirty days for a new slab to cure fully.
Is a moisture barrier always necessary?
Yes, a moisture barrier is essential regardless of which installation method is chosen for concrete floors.
Which method is best for basements?
Floating floors or glue-down engineered hardwood generally perform best in basement environments prone to moisture.
Conclusion
Attaching hardwood floor to concrete is achievable through glue-down, floating, or plywood subfloor methods, provided moisture testing and proper preparation come first. Choosing the right method based on hardwood type and concrete condition ensures a stable, long-lasting floor for years to come.
Related Articles
Burnished Slate Metal Roof: Complete Guide to Beauty &Cost
Can You Tile Over Tile: A Complete Guide 2026
How Much Does It Cost to Waterproof a Basement?
Shower Door Repair: Complete Guide to Fix Common Shower Door Problems