



A roof vent plays a major role in keeping the attic space cool and dry by allowing hot air and moisture to escape from the home. Installing a roof vent correctly is essential because a poorly placed or badly sealed vent can lead to leaks, energy loss, and even structural damage over time. This guide explains the entire process of installing a roof vent in simple, easy-to-follow steps.
Understanding the Purpose of a Roof Vent
A roof vent allows warm, humid air trapped in the attic to escape outside instead of building up under the roof deck. This airflow helps regulate temperature and prevents moisture problems that can shorten the life of the roof.
How Roof Vents Improve Attic Airflow
Roof vents work together with soffit vents to create a continuous flow of air, pulling cool air in from below and pushing warm air out from above. This constant circulation keeps the attic temperature closer to the outdoor temperature throughout the year.
Why Proper Ventilation Prevents Roof Damage
Without enough ventilation, trapped heat and moisture can cause shingles to age faster and wood decking to rot from the inside out. Installing a roof vent correctly reduces these risks and helps the entire roofing system last longer.
Types of Roof Vents You Can Install
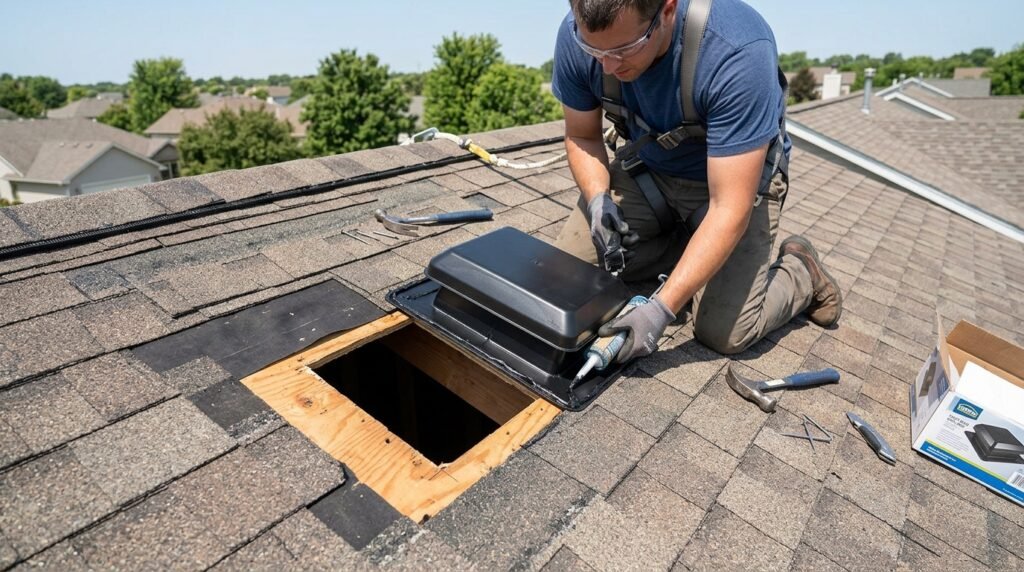
There are several types of roof vents available, and choosing the right one depends on the roof design, attic size, and local climate conditions. Knowing the differences helps you decide which type suits your home best before starting installation.
Box Vents
Box vents are static vents that sit on the roof surface and rely on natural airflow to pull hot air out of the attic. They are simple to install and do not require any moving parts or electricity to function.
Ridge Vents
Ridge vents run along the peak of the roof and provide continuous ventilation across the entire length of the ridge line. They blend in with the roofline and are considered one of the most efficient passive ventilation options available.
Turbine Vents
Turbine vents use wind power to spin a turbine that actively pulls air out of the attic space faster than static vents. They work best in areas that get regular wind but may perform poorly in calm climates.
Power Vents
Power vents use an electric fan to actively exhaust hot air from the attic, making them useful in homes with very poor natural airflow. These vents often include a thermostat that turns the fan on automatically when attic temperatures rise.
Tools and Materials Needed for Roof Vent Installation
Having the right tools ready before starting the installation makes the entire process smoother and reduces the chances of mistakes on the roof.
| Tool or Material | Purpose |
| Tape measure | Marking vent placement accurately |
| Chalk line | Drawing straight cutting guides |
| Reciprocating saw | Cutting the roof decking opening |
| Roofing nails | Securing the vent flange to the roof |
| Roofing sealant | Sealing edges to prevent leaks |
| Pry bar | Lifting shingles around the vent area |
| Safety harness | Protecting the installer while working on the roof |
Step-by-Step Process to Install a Roof Vent
Following a clear, organized process ensures the roof vent is placed correctly and sealed properly against future leaks. This section walks through each stage from planning to final sealing.
Choosing the Right Location
The vent should be placed near the top of the roof, ideally close to the ridge, so it can pull hot air out effectively. Avoid placing vents too close to valleys or areas with heavy water flow to reduce the risk of leaks.
Marking and Cutting the Opening
Once the location is chosen, trace the vent base onto the roof and use a reciprocating saw to cut through the shingles and decking. Cut carefully along the marked line to avoid making the opening larger than the vent itself.
Removing Surrounding Shingles
Use a pry bar to gently lift the shingles around the cut opening so the vent flange can slide underneath them. This step is important because the top and side shingles should overlap the vent flange to direct water away from the opening.
Placing the Vent Over the Opening
Set the vent directly over the cut hole, making sure the flange sits flat against the roof deck on all sides. Check that the vent is centered and level before moving on to fastening it in place.
Securing the Vent with Nails
Drive roofing nails through the flange and into the decking, spacing them evenly to hold the vent firmly in place. Be careful not to overdrive the nails, as this can crack the flange or reduce its holding strength.
Sealing the Edges
Apply roofing sealant around the edges of the flange and over each nail head to create a fully watertight barrier. This sealing step is one of the most important parts of the process, since most vent leaks happen due to poor sealing.
Replacing the Shingles Around the Vent
Lay the shingles back over the top and sides of the vent flange, following the same overlapping pattern as the rest of the roof. The bottom edge of the vent should sit on top of the lower shingles, while the top and sides are covered by the upper shingles.
Safety Tips While Installing a Roof Vent
Working on a roof always carries some risk, so following basic safety practices is necessary throughout the installation process.
Using Proper Fall Protection
Always wear a safety harness connected to a secure anchor point when working near the roof edge or on a steep slope. Fall protection equipment significantly reduces the risk of serious injury during roof vent installation.
Choosing the Right Weather Conditions
Avoid installing a roof vent during rain, high winds, or extreme heat, as these conditions make the roof surface unstable and unsafe. Cool, dry, and calm weather provides the safest working environment for this type of job.
Working with a Partner
Having a second person nearby, even just to hand tools or hold the ladder steady, adds an extra layer of safety during the installation. A partner can also call for help quickly if any accident occurs while working on the roof.
Common Mistakes to Avoid When Installing a Roof Vent
Several installation mistakes are common among first-time installers, and knowing them ahead of time can save time and prevent future leaks.
Cutting the Opening Too Large
Cutting a larger hole than needed weakens the surrounding decking and makes it harder to get a tight seal around the vent flange. Always measure the vent base carefully before cutting to keep the opening as precise as possible.
Skipping the Sealant Step
Some installers rely only on nails to hold the vent in place, which leaves gaps that can let water seep through over time. Sealant should always be applied around the flange edges and nail heads for complete protection.
Placing Too Few or Too Many Vents
Installing too few vents limits airflow, while too many vents can sometimes interfere with proper attic pressure balance if not planned correctly. Following manufacturer ventilation calculations based on attic square footage helps achieve the right balance.
How This Guide Compares to Other Roof Vent Resources
Many existing guides only explain the basic cutting and nailing steps without going into detail about vent types, sealing methods, or common mistakes that cause leaks. This guide covers the full process from choosing the right vent type to sealing and safety, giving readers a more complete and practical resource than most shorter articles available online.
Frequently Asked Questions
How many roof vents does a house need?
Most homes need about one square foot of vent area for every 300 square feet of attic space, split between intake and exhaust vents.
Can I install a roof vent myself?
Yes, a roof vent can be installed by a homeowner with basic tools and roofing experience, though hiring a professional is recommended for steep or complex roofs.
Where is the best place to install a roof vent?
The best placement is near the top of the roof, close to the ridge, to maximize hot air extraction from the attic.
What happens if a roof vent is not sealed properly?
An improperly sealed vent can allow water to leak into the attic, leading to mold growth, wood rot, and damage to insulation.
Conclusion
Installing a roof vent correctly involves choosing the right vent type, cutting an accurate opening, and sealing every edge to prevent leaks. When done carefully, a properly installed roof vent improves attic airflow, protects the roofing system, and helps the home stay more energy efficient throughout the year.
Related articles
How Do You Measure A Ceiling Fan: Complete Guide 2026




