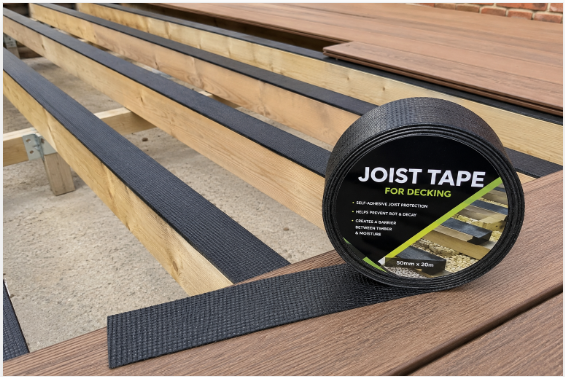

A deck is only as strong as what sits beneath it. While most homeowners focus on the visible surface — the boards, the railing, the finish — the real foundation of a long-lasting deck lies in the substructure underneath. Joists, ledgers, and beams made from timber are constantly exposed to moisture, and without adequate protection, that exposure leads to rot, structural weakness, and expensive repairs.
Joist tape for decking is one of the simplest and most cost-effective tools available to address this problem directly, and understanding how it works helps every deck builder make smarter choices from the ground up.
What Is Joist Tape for Decking?
Joist tape for decking is a self-adhesive protective strip applied to the top surface of timber joists and other substructure components before the deck boards are laid. Its primary purpose is to create a moisture-resistant barrier between the wood and any water that finds its way through the decking above.
The Basic Composition of Joist Tape
Most high-quality joist tapes are built around a butyl adhesive layer, which is known for its strong bond to timber surfaces and its natural resistance to water penetration. The tape typically features a durable PET (polyethene terephthalate) liner on the outer face, which holds up against physical pressure, UV exposure, and temperature changes throughout the year.
The combination of a flexible adhesive base and a tough outer liner is what makes joist tape suitable for all-weather outdoor conditions.
Why Timber Substructures Need Protection?
Timber is an organic material, and its natural cellular structure makes it highly absorbent. Even pressure-treated lumber, which is designed to resist decay better than untreated wood, remains vulnerable at points where fasteners penetrate its surface and along the top edge where water naturally collects.
Without a protective layer, these areas become entry points for moisture that slowly breaks down the wood from within, encouraging mould, mildew, and eventually structural rot that compromises the entire deck frame.
How Joist Tape Differs from Other Waterproofing Methods?
Unlike liquid sealants that are brushed or sprayed onto timber and require drying time, joist tape is a physical barrier that is applied quickly, adheres firmly, and begins working immediately. It does not crack, peel, or require reapplication in the way that paint-on products often do over time.
For builders and DIY enthusiasts alike, joist tape represents a reliable, low-effort method of waterproofing that integrates seamlessly into the construction process without slowing it down.
Why Joist Tape Matters for the Life of Your Deck?
The condition of your deck’s substructure determines how long your entire deck lasts. Many homeowners invest significantly in premium composite or PVC deck boards, only to find that the timber frame beneath has deteriorated years before the surface shows any visible signs of wear.
The Connection Between Substructure Health and Deck Longevity
A rotting joist does not just affect one plank — it undermines the structural integrity of the entire section of deck it supports. When joists weaken due to moisture damage, boards become unstable, fasteners lose their grip, and the surface begins to flex or sink in ways that are both dangerous and costly to repair.
Applying joist tape for decking at the construction stage is a proactive investment that significantly reduces the likelihood of this kind of progressive structural failure.
Moisture Entry Points That Tape Directly Addresses
The top face of a joist is the most exposed surface during and after construction. Rainwater that seeps between deck boards lands directly on this surface, and any fastener hole becomes a direct channel into the timber’s core. Joist tape covers this entire surface, sealing around screw and nail penetrations to limit the amount of water that can reach the wood beneath.
Ledger boards — where the deck connects to the house — are equally vulnerable and benefit from the same protection.
Long-Term Cost Savings of Using Joist Tape
Replacing a rotted joist or a section of damaged framing is significantly more disruptive and expensive than the small upfront cost of applying tape during the initial build. In many cases, joist and ledger repair requires removing deck boards, cutting out damaged timber, and fitting new structural members — a process that can easily cost several times more than the tape that would have prevented the damage in the first place.
Used correctly, joist tape for decking extends the serviceable life of a timber substructure by many years.
How to Apply Joist Tape Correctly?
Applying joist tape is one of the more straightforward steps in the deck-building process, but doing it properly makes a significant difference in how well it performs over the long term.
Surface Preparation Before Application
The timber surface must be clean, dry, and free from dust, sawdust, bark, or any debris before the tape is applied. Any moisture present on the wood at the time of application will prevent the adhesive from bonding properly, which can lead to the tape lifting at the edges and allowing water to track underneath.
In damp or cold conditions, it is worth waiting until the timber has dried out fully or wiping it down with a dry cloth before beginning.
Applying the Tape Evenly and Firmly
Once the surface is ready, the tape should be laid along the full length of the joist top, centred so that it wraps slightly down each side for maximum coverage. Firm, even pressure applied immediately after laying the tape — ideally using a hand roller rather than just finger pressure — ensures that the adhesive makes full contact with the wood grain and creates a consistent seal.
Particular attention should be paid to the ends of joists and any areas where cuts have been made, as these exposed end-grain sections absorb moisture most rapidly.
Avoiding Common Application Mistakes
Wrinkles and air pockets are the two most common problems during application, and both reduce the tape’s effectiveness by creating channels where water can travel beneath the barrier. To avoid this, unroll the tape gradually rather than pulling a long section free before pressing it down.
Working in sections of roughly 30 to 60 centimetres at a time gives better control and produces a smoother, tighter bond across the entire length of the joist.
Types of Joist Tape and What to Look For
Not all joist tapes are created equal, and choosing the right product for your specific project can make a meaningful difference in how well your substructure holds up over time.
| Feature | What to Look For | Why It Matters |
| Adhesive Type | Butyl-based adhesive | Provides strong, flexible, waterproof bond |
| Outer Liner Material | Durable PET film | Resists tearing, UV degradation, and physical wear |
| Width | Covers full joist width plus sides | Ensures complete coverage of the most exposed surface |
| Temperature Range | All-weather rated | Maintains adhesion in both cold winters and hot summers |
| Flexibility | Flexible and conformable | Follows timber surface variations without gaps |
| Self-Adhesive | Yes, peel-and-stick | Speeds up application and removes the need for additional tools |
When selecting joist tape for decking, prioritise products that are specifically designed for outdoor structural use rather than general-purpose flashing tapes, which may not perform as reliably under the ongoing physical pressure of foot traffic and seasonal expansion and contraction of timber.
Joist Tape and Composite Decking: What You Need to Know
One of the most common questions surrounding joist tape is whether it is still necessary when composite or PVC deck boards are used as the surface. The answer depends largely on what material is used for the substructure itself, not just the boards.
When Timber Substructures Are Used with Composite Boards
Composite deck boards are highly moisture-resistant on their own, but they are typically installed over a timber frame that does not share those same properties. The boards above may shed water efficiently, but the joists below still collect moisture at fastener penetrations and along their top faces.
In this situation, joist tape for decking is just as important as it would be under traditional timber boards, because the substructure remains vulnerable regardless of what sits on top of it.
Alternative Substructure Materials That May Not Require Tape
Aluminium framing systems represent a growing alternative to timber for deck substructures. Because aluminium does not absorb water or rot, it does not carry the same vulnerability that makes joist tape necessary for timber.
Builders and homeowners who choose an aluminium substructure are working with a material that is inherently resistant to the kinds of moisture damage that joist tape is designed to prevent, making tape largely unnecessary in those cases.
Matching Your Protection Strategy to Your Materials
The most effective approach is to assess your entire substructure material by material and apply appropriate protection wherever moisture vulnerability exists. Timber joists and ledger boards benefit from joist tape. Metal connectors and fasteners benefit from corrosion-resistant coatings. A holistic view of substructure protection produces the most durable and reliable results over the full life of the deck.
Key Benefits of Using Joist Tape for Decking
To summarise the practical value that joist tape brings to any timber-framed deck build, the following points capture what makes it a non-negotiable step in any responsible construction process:
- Creates a direct physical barrier against moisture on the most vulnerable surfaces of timber joists and ledger boards.
- Reduces the risk of rot developing at fastener penetration points, which are the most common entry points for water damage.
- Extends the overall serviceable life of the deck substructure, delaying or entirely preventing costly structural repairs.
- Adds minimal time and cost to the construction process while delivering disproportionately large long-term value.
- Compatible with all standard timber substructure components including joists, rim joists, ledger boards, and stair stringers.
- Performs reliably in all weather conditions when a quality butyl-adhesive, PET-lined tape is selected and correctly applied.
Frequently Asked Questions
Is joist tape necessary if timber is already pressure treated?
Pressure treatment improves timber’s resistance to decay, but it does not make it immune to moisture damage, particularly at cut ends and fastener points. Joist tape provides an additional layer of protection that works alongside the treatment rather than replacing it.
Can joist tape be applied over already-installed joists?
It is best applied during construction before boards are laid, as full coverage of the joist top is only achievable when the surface is open and accessible. Retroactively applying it to joists already in a built deck is difficult and largely ineffective.
How wide should joist tape be?
The tape should be wide enough to cover the full top surface of the joist and wrap down both sides by at least a centimetre or two. For standard 45mm joists, a tape width of around 60 to 75mm typically provides adequate coverage on all sides.
Conclusion
Joist tape for decking is a small investment that delivers significant long-term protection for one of the most important parts of your outdoor structure. By shielding timber joists and ledgers from moisture at their most vulnerable points, it extends the life of your substructure, preserves structural integrity, and saves money on repairs that can otherwise become unavoidable without this basic layer of protection in place.
Related Articles
How to Clean Vinyl Floors: The Complete Step-by-Step Guide
Factors Affecting Door Installation Cost: What You Need to Know
Rub-on Transfers for Furniture: Transform Your Decor with Ease
18 Inch Deep Base Cabinets: A Smart Storage Solution for Every Kitchen